

how to fix exhaust leak

How to Fix an Exhaust Leak on Your Own
Exhaust leaks vary in extent. Some leaks may cause serious performance problems on your car while others may give your car a cool sound and make it have a slight improvement in performance.
More...
Today, I will teach you how to fix an exhaust leak at home with the most basic of tools and parts. Do you know the importance of an exhaust system?
How to Fix an Exhaust Leak on Your Own
Objectives of an Exhaust System
Your car's exhaust system serves a basic purpose only that it happens in a complicated way. The basic exhaust system is to get rid of the gases being produced in the combustion chamber.
In order to do this effectively, the exhaust gases must be excreted far away from the cabin and in an environmental friendly manner.
The exhaust system has a secondary function of muffling the sound produced in the engine as well as the high velocity sound leaving your tail pipe. The complexity of the system comes into play when you consider the temperatures involved, the environmental standards enforced and the distance involved.
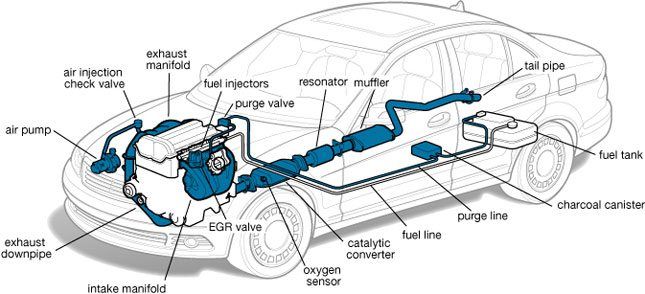
Know Your Exhaust
To achieve the basic and secondary functions your exhaust system requires several pipes, heat shields, rubber hangers, manifolds, mufflers, joints and flexible unions.
The huge temperature differences (from room temperature to over 1250 degrees) exact a lot of stress on the material and components.
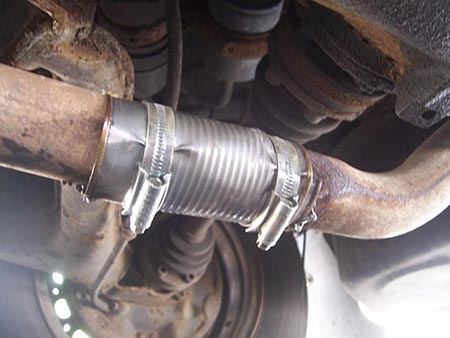
Via levintirecenter.com
A good combustion system will give water as the by-product. The water leaves your vehicle in vapour form, but during cold mornings it might condense into water increasing the risk of rust.
Since the exhaust system is typically under the vehicle (exposed to all the harshness of the road) it might get a hit or two that needs to be repaired.
Here is How to Check and Fix Exhaust Leaks
What You Will Need
- Steel toothed brush
- PPEs (gloves, eye goggles, etc.)
- Sandpaper
- An empty tin can
- Acetone
- Epoxy/ exhaust tape
- Exhaust patch
- Hose clamps
- Jack/ ramp

Checking the Exhaust System for a Leak
- STEP 1
- STEP 2
- STEP 3
- STEP 4
- STEP 5
Park your car on a flat level ground. Do not park on gravel, dirt or grass. A level concrete area is recommended.
If you have a ramp, then it is better than a jack. If you use a jack, be sure to support the vehicle with tripods or solid stone bricks.

Allow your vehicle to cool down for several hours. Remember we said that the temperatures can get very hot.
To know if your exhaust system is well cooled, you can touch the hood of the car. If there is any warmth you can be dead sure that the exhaust system is very hot.
Inspect your exhaust system from the engine side all the way to the muffler of your vehicle. In case you already know where the leak is, then you can cut the chase and head straight there.
You will be looking for cracks, scrapes, bends, holes or rust.
If you still can't locate the leak by visual inspection, you will need to ask someone to start the car. Ensure that the vehicle is in Parking or at least in neutral.
Pull the hand-brake and if possible chock the wheels (for shifts, this is a must). This time round, you will be looking for smoke puffs. When your car is running, it is very dangerous to work underneath it. Avoid any moving parts.
Inspect the extent of damage. Based on the extent of damage, they will be different options of fixing your exhaust leak.
In some cases you will just need to do minor repairs while in others, you will need to replace an entire section. Scrapes and minor holes can be fixed without having to cut the exhaust.
Fixing the Leak
Method #1
Sealing small holes – this can be done using an exhaust patch and in the case where the holes are extremely small, you can do it using epoxy or exhaust tape. Larger holes will need an aluminium patch.
- STEP 1
- STEP 2
- STEP 3
- STEP 4
- STEP 5
- STEP 6
Wear your eye goggles and gloves. Carefully scrub the region bordering the leak with your steel brush. This is to remove any mud, rust or dirt.
The repair method you will use will not hold when done over dirt and mud. Be sure to scrape all around, including the top side.
With a sandpaper, smoothen the surface you just scraped. It is best to use a fine grit sandpaper to give you a smoother finish.
The sandpaper will not only remove any stubborn dirt or rust that might have survived the steel brush but it will also create small abrasions that will help the tape adhere to. Again, scrub all around.
Using acetone, rinse the region you have scrubbed. The acetone will help the exhaust to form a stronger bond with the metal. In case you don't have acetone, you can use nail polish.
Acetone is a chemical that can cause a bad irritation to the eyes or mouth. Be careful not to drip the acetone on your eyes or mouth since it causes severe irritation.

Determine the extent of hole. If the hole is small, you will use and exhaust tape or epoxy without the need for a patch.
If the hole is large, you will need to use a patch. If the hole is too large, even a patch will not help you

Read the instructions that come with the specific tape you bought. Different tapes have different repair techniques.
Some exhaust wraps will require you to apply when the surface is still warm while others will need the surface to be wet.
Ensure that you allow a considerable distance from the centre of the hole, a few millimetres will do.
Wrap at least two layers of the exhaust tape. This will give you a tighter wrap

If you are using epoxy without a patch or exhaust tape, mix the hardener with the clear solution as directed in the instruction part of the solutions.
Since the epoxy will start drying up as soon as it is mixed, apply it immediately on the leaking region using a wooden dowel. Apply a thick layer of the epoxy on the leaking area.
You can see how to fix exhaust with epoxy by click here
Method #2
Sealing larger holes – if the holes are smaller than three inches, but larger than pin holes, then you will need to use a patch to seal them. In case they are larger than 3 inches, then you might need to cut the entire part and replace it.
- STEP 1
- STEP 2
- STEP 3
- STEP 4
- STEP 5
- STEP 6
Establish the size of the patch that you need. You can get exhaust patches from your spare parts dealer.
Alternatively, you can make your own patch from an aluminium can. Allow half an inch or one clearance from the leak.
This means that your patch will be half an inch or one wider in diameter from the area of the patch. Make sure to read the instructions that come with the patch you bought
If you didn't purchase a patch from your dealer; create your own patch using a pair of scissors.
Remember to allow clearance to cover the patch. If the leak is huge, you can wrap the can all around the region, but if it is small, cutting a circle will do just fine.
Be careful while cutting the aluminium. I recommend wearing a pair of leather gloves.
Apply the entire area of the leakage with epoxy. Apply the epoxy in the same way you would if you were to be sealing with the epoxy alone.
You will need to be quick with your applying since the epoxy dries first and in this case, you will have more ground to cover.
The area of application should be the same or slightly bigger than the area of the patch.
Lay the aluminium patch over the exhaust leak. You can wrap the entire aluminium around the patch or just a small bit of it (enough to cover the leak).
Ensure that the aluminium patch is in the middle of the leak. Don't worry if the epoxy squeezes on the side of the patch.
Apply extra epoxy over the aluminium patch. If you are running out of epoxy, apply some at the edges of the patch, but in case, epoxy is not a problem, cover the aluminium patch with the epoxy.
This will hold the patch in place while at the same time protecting the patch itself from leaking.
If you wrapped the aluminium patch all around the exhaust, you don't need to cover it with the epoxy. Just pay close details to the perimeter of the patch.
Securely hold the patch in place with clamps. Using as many as two hose clamps to hold the patch in place depending on the size of the patch.
Alternatively, you can use three hose clamps. One on both sides and one at the center. Tighten the clamps to get a good grip.
Summary
Exhaust leaks can have a detrimental effect on the performance of your car. Exhaust gases are not only bad for your car's performance, but they are also very dangerous when they leak into your vehicle cabin.
They not only make you uncomfortable sitting in your cabin, but when inhaled for long, they may have fatal health consequences. If you smell any exhaust fumes in your car cabin, you should check your exhaust system immediately
There you have it. I would like to thank you for your time. I cannot say this enough number times; wear protective material. Goggles and gloves at the very least.
You will want to alert the person doing your laundry to expect a hard to remove gloop on your clothes. If you liked this post, share it with your friends
how to fix exhaust leak
Source: https://automotivebros.com/how-to-fix-an-exhaust-leak/
Posted by: ervinligem1969.blogspot.com
0 Response to "how to fix exhaust leak"
Post a Comment